1. Overview
GFI MailEssentials 22.0 introduces a built-in SMTP Relay to eliminate dependencies on the legacy IIS SMTP server. This provides a modern, secure, and integrated approach to email processing.
This guide will help you:
- Set up the SMTP Relay
- Enable secure transmission (STARTTLS)
- Verify correct operation
- Troubleshoot common issues
2. Deployment & Initialization
2.1 Pre-Installation Requirements
Before installing MailEssentials, confirm that Web Server (IIS) is installed. If IIS is not installed, the initial installation may fail, but it will succeed once IIS is present. It will succeed on the second attempt because MailEssentials installs it for you; however, if IIS is already installed, the installation will succeed on the first attempt.
The Application Server role is only applicable to Windows Server 2012 and earlier versions. For newer versions of Windows Server, focus on the Web Server (IIS) role installation.
#### Step-by-Step Installation Process:
1. **Open Server Manager**
- Open the Server Manager dashboard
- Click **Quick Start** and click **Add Roles and Features**
2. **Installation Type**
- Read the "Before you begin" information provided in the wizard and click **Next**
- Select **Role-based or Feature-based installation** and click **Next**
3. **Server Selection**
- From the server pool, select the server on which GFI MailEssentials will be installed and click **Next**
4. **Server Roles Selection**
- From the **Select Server Roles** dialog, select:
- **Application Server** (Windows Server 2012 and earlier only)
- **Web Server (IIS)**
- Click **Next**
- If the roles are already installed, ensure that their features are enabled as per the remaining instructions
- A dialog box prompting you to install various dependencies may be displayed. Click the **Add Features** button to continue
5. **Features Configuration**
- In the **Select Features** screen, navigate to:
- **.NET Framework 4.5 Features** > **WCF Services**
- Select **HTTP Activation**
- Click **Next**
- A dialog box prompting you to install various dependencies may be displayed. Click the **Add Features** button to continue
6. **Application Server Configuration** (Windows Server 2012 and earlier)
- Read the Application Server information provided in the wizard and click **Next**
- In the **Application Server > Role Services** screen, select:
- **Web Server (IIS) Support**
- **Windows Process Activation Service Support**
- **HTTP Activation**
- A dialog box prompting you to install various dependencies may be displayed. Click the **Add Features** button to continue
7. **Web Server Role (IIS) Configuration**
- Read the Web Server Role (IIS) information provided in the wizard and click **Next**
- In the **Web Server Role (IIS) > Role Services** screen, ensure the following features are selected:
#### Required IIS Features:
**Common HTTP Features:**
- Static Content
- Default Document
- Directory Browsing
- HTTP Errors
**Health and Diagnostics:**
- HTTP Logging
- Request Monitor
**Performance:**
- Static Content Compression
**Security:**
- Request Filtering
- Windows Authentication
**Application Development:**
- ASP.NET 4.5
**Management Tools:**
- IIS Management Console
8. **Complete Installation**
- In the **Confirm Installation Selections** screen, click **Install** to finalize the Web Server IIS role installation
- When feature installation is complete, click **Close**
2.2 When Is the SMTP Relay Installed?
During installation, MailEssentials detects whether an existing mail transport service, such as IIS SMTP or Exchange is present.
MailEssentials operates in one of these two transport modes:
- Built-in MailEssentials SMTP Relay when
use_local_smtp = 1 - IIS / Exchange SMTP path when
use_local_smtp = 0
If the system is operating in built-in SMTP Relay mode, the SMTP Server Configuration page is available in the MailEssentials UI and can be used to configure relay settings. If the system is operating in IIS / Exchange mode, that page is not available, and mail flow must be configured through the IIS / Exchange transport path instead.
2.3 Configuration Requirements
The SMTP Relay installation alone does not configure mail flow. After installation, you must define how messages move between the relay, Exchange, and any external smarthost.
If MailEssentials is installed on a separate gateway, define both inbound (to Exchange) and outbound (to smarthost) routes as shown in Section 5 – Essential Configuration Parameters.
2.4 Verify Which SMTP Transport Path Is Active
This step confirms which MailEssentials SMTP transport path is currently active:
-
Open the Registry Editor (
regedit). -
Navigate to:
HKEY_LOCAL_MACHINE\SOFTWARE\Wow6432Node\GFI\MailEssentials\Config -
Check the key
use_local_smtp:1= Built-in MailEssentials SMTP Relay is active0= IIS / Exchange SMTP is active
If use_local_smtp = 1, use the SMTP Server Configuration page in the MailEssentials UI or smtprelay.ini to configure the relay.
If use_local_smtp = 0, configure mail flow through IIS / Exchange instead.
3. Post-Installation Verification
After installation, verify that the MailEssentials SMTP Webhook is active and reachable:
- Open a browser on the MailEssentials server.
- Navigate to
http://localhost/MailEssentials_smtpWebHook/api/email/scan. - You should see the following message:
{"message": "The requested resource does not support http method 'GET'."}
This confirms that the internal MailEssentials Webhook API is running correctly.
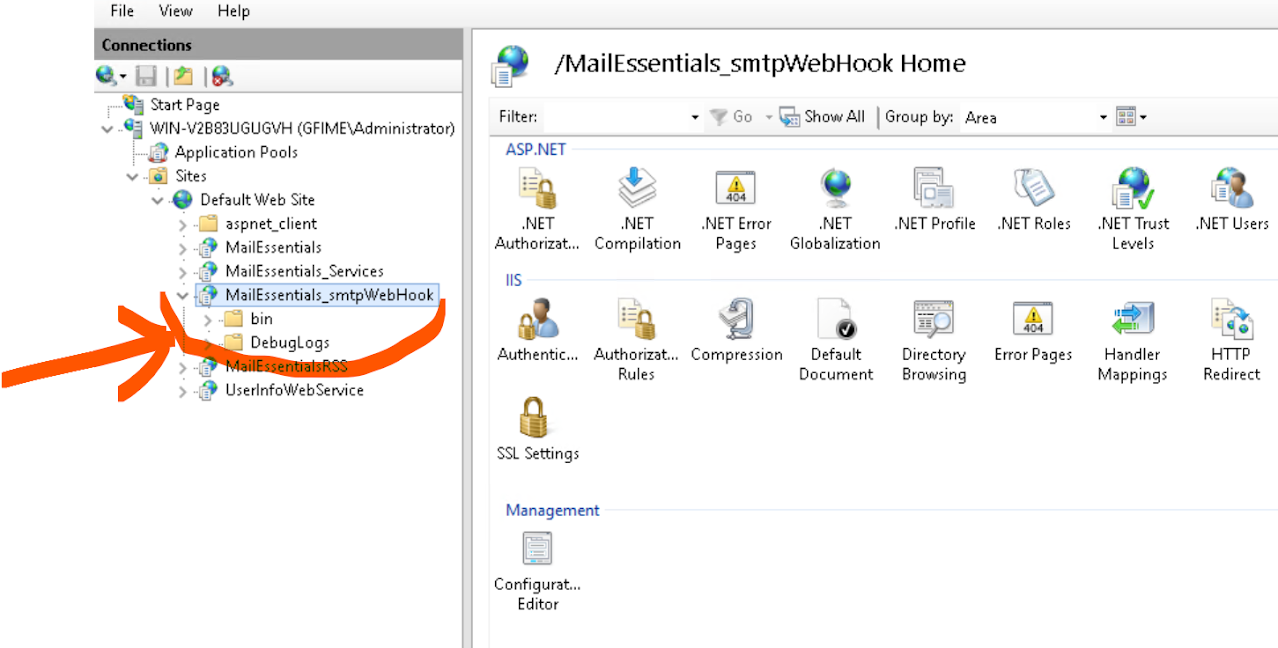
If you receive a 404 Not Found error:
- Confirm IIS hosts the application path
/MailEssentials_smtpWebHookas seen below. You can also reach the following page via this path: Press Win + R → typeinetmgr→ Enter. - Check that no local firewall or proxy blocks
localhostrequests.
4. Configuration Files & Folder Structure
All configuration and log files for the SMTP Relay reside in:
C:\Program Files (x86)\GFI\MailEssentials\smtprelay\smtprelay.ini— Main configuration filesmtprelay.exe— SMTP Relay service executable
5. Essential Configuration Parameters (smtprelay.ini)
5.1 listen – Server Address and Port
listen = 0.0.0.0:25This defines the interface and port where the relay listens for incoming connections.
TLS listener configuration is not required for standard GFI MailEssentials operation unless specifically advised by GFI Support.
5.2 allowed_nets – Authorized Networks
allowed_nets = 192.168.1.0/24 10.0.0.0/8- Use CIDR notation for network ranges.
- Separate multiple networks with spaces.
- Do not use an empty value (
"") in production.
5.3 Mail Processing (webhook_url)
This parameter defines the internal endpoint used to pass emails to the MailEssentials scanning engine.
webhook_url = http://localhost/MailEssentials_smtpWebHook/api/email/scanTo verify connectivity, run the following in PowerShell:
Invoke-WebRequest http://localhost/MailEssentials_smtpWebHook/api/email/scan -UseBasicParsingExpected output:
{ "message": "The requested resource does not support http method 'GET'." }
If a 404 error appears, verify the service and IIS path as described in Section 3.
5.4 Smart Host Prerequisites
Before editing smtprelay.ini, identify your two smart hosts:
- Primary: receives inbound scanned mail and delivers it to Exchange.
- Secondary: relays outbound mail to external destinations (e.g., Office 365).
5.5 remotes – Forwarding Destinations
This setting defines how the relay forwards messages after scanning. Insert this line between listen and allowed_nets.
Example (no encryption):
remotes = smtp://exchange.domain.local:25?skipVerify&recipient=.*@yourdomain\.com smtp://smtp.office365.com:587?skipVerifyConfiguration breakdown:
smtp://exchange.domain.local:25?skipVerify&recipient=.*@yourdomain\.com→ forwards inbound mail to Exchange.smtp://smtp.office365.com:587?skipVerify→ relays outbound mail externally.
Complete Example:
# Forward inbound mail to Exchange
# Relay outbound mail to external smarthost (Office 365)
remotes = smtp://exchange.domain.local:25?skipVerify&recipient=.*@yourdomain\.com \
           smtp://smtp.office365.com:587?skipVerify
If MailEssentials and Exchange run on the same server, set the first destination to localhost:25 instead of an external hostname.
Encrypted configuration (STARTTLS):
remotes = starttls://user:pass@smtp.office365.com:587Replace user:pass with valid SMTP credentials. Place both the certificate (PEM) and private key (PEM) in the same directory as smtprelay.ini.
Notes:
- Separate multiple remote destinations with one space.
- Use
skipVerifyonly for testing; production systems should validate certificates. - Ensure Exchange or your smarthost allows relay from the MailEssentials server’s IP address.
6. Applying and Testing Configuration
- Save and close
smtprelay.ini. - Open Task Manager (Ctrl + Shift + Esc) and end
smtprelay.exe. - Restart the service GFI MailEssentials Attendant via
services.msc. - Re-test the webhook connection as described in Section 3.
- Send a test email and confirm it shows queued → delivered in:
C:\Program Files (x86)\GFI\MailEssentials\smtprelay\logs\smtprelay.log
7. DNS Configuration
- Update your domain’s MX or A record to point to the MailEssentials host.
- This ensures all inbound mail is scanned before reaching Exchange.
- DNS changes may take 24–48 hours to propagate, depending on TTL settings.
8. Troubleshooting and Verification
8.1 Webhook Errors (404 / 451)
- Confirm IIS hosts
/MailEssentials_smtpWebHook. - Check local firewall or proxy rules.
8.2 Mail Delivery Issues
- Inbound: confirm the first
remotesentry points to Exchange (e.g.,localhost:25). - Outbound: verify credentials and TLS settings for the smarthost.
8.3 Connectivity Test
Test-NetConnection -ComputerName exchange.domain.local -Port 258.4 Log Monitoring
Review logs\smtprelay.log for non-200 Webhook responses or delivery failures.
9. Advanced Parameters (Optional)
The following options are available for advanced use and are not required for standard configurations:
Logging
logfile    = logs/smtprelay.log     # Log file path
log_format = default                # Options: default, plain, json
log_level  = info                   # panic, fatal, error, warn, info, debug, trace
Additional settings (such as authentication, connection limits, and timeout parameters) may exist but should be modified only under guidance from GFI Support.
Syed Haider
Comments