Overview
This article describes the process to follow in order to configure the SpamTag features within GFI MailEssentials.
Solution
-
Go to Anti-Spam > SpamTag.
-
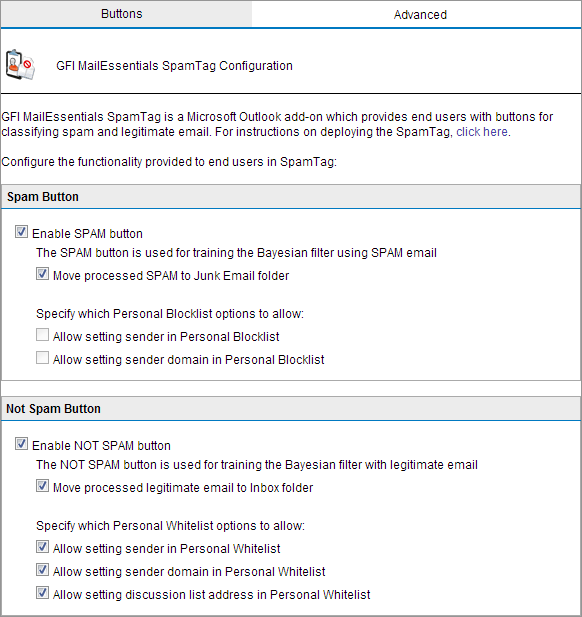
From the Spam Button area, configure the features related to false-negatives, that is, the situations when spam emails are not detected as spam:
Option Description Enable SPAM button
The Spam button is shown in SpamTag and when clicked, the selected email trains the Bayesian Analysis filter.
Move processed SPAM to Junk Email folder
When clicking Spam, the selected email is automatically moved to the Microsoft Outlook Junk E-mail folder.
Allow setting sender in Personal Blocklist
A sub-option is shown under the Spam button that enables users to add the sender's email address to their Personal Blocklist.
Allow setting sender domain in Personal Blocklist
A sub-option is shown under the Spam button that enables users to add the sender's domain to their Personal Blocklist.
-
From the Not Spam Button area configure the features related to false-positives, that is, the situations when legitimate emails are incorrectly identified as spam:
Option Description Enable NOT SPAM button
The Not Spam button is shown in SpamTag and when clicked, the selected email trains the Bayesian Analysis filter.
Move processed legitimate email to Inbox folder
When clicking Not Spam, the selected email is automatically moved to the Inbox folder.
Allow setting sender in Personal Whitelist
A sub-option is shown under the Not Spam button that enables users to add the sender's email address to their Personal Whitelist.
Allow setting sender domain in Personal Whitelist
A sub-option is shown under the Not Spam button that enables users to add the sender's domain to their Personal Whitelist.
Allow setting discussion list address in Personal Whitelist
A sub-option is shown under the Not Spam button that enables users to whitelist newsletters/discussion lists.
-
From the Advanced tab, configure the following advanced options.
Option Description Import Outlook Junk Settings to Personal Blocklist and Personal Whitelist
Imports the addresses listed in Microsoft Outlook Safe Senders and Blocked Senders into the GFI MailEssentials Personal Whitelist and Personal Blocklist.
The list of Safe Senders and Blocked Senders in Microsoft Outlook is available from Junk > Junk e-mail options.
Import Outlook contacts to Personal Whitelist
Imports the list of Microsoft Outlook contacts to the Personal Whitelist.
Override Microsoft Outlook Junk
When selecting this option, the options that are enabled in SpamTag override the equivalent settings in Microsoft Outlook Junk, to ensure that only one anti-spam management system is utilized on the client-side. When users use a Microsoft Outlook Junk option, a SpamTag function is run instead.
Hide the Console button
Hides the Console button from the SpamTag toolbar. No direct access to the GFI MailEssentials console is provided but users can still log in by manually typing the URL in a browser.
- Apply changes.
If you uncheck the Enable SPAM button or the Enable NOT SPAM button, the corresponding options in the SpamTag Outlook extension will be grayed out.
Testing
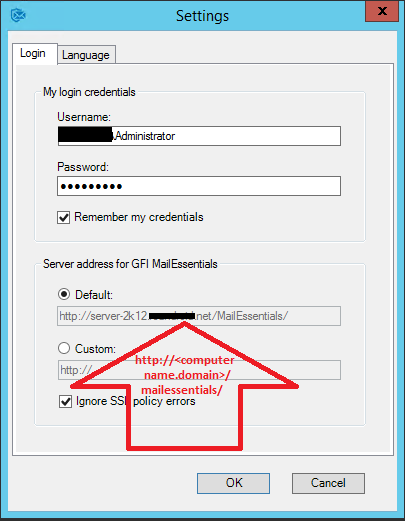
Verify that the SpamTag toolbar is visible in Microsoft Outlook and that it connects successfully to GFI MailEssentials.
Once you click on the console it will prompt you to sync the MailEssentials account:
Priyanka Bhotika
Comments